Built in Labels


|
Built in Labels |
|
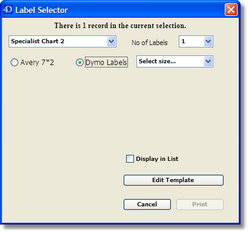
Select the type of label you want from the drop down list at the top of this window (e.g. Specialist Chart). There are a variety of options, so print each and decide which is best suited.
Select whether you are using Avery or Dymo labels. If you are printing Dymo labels, select the Dymo Label Printer for labels in your Printing Preferences (File > Printing Preferences).
Select how many labels you would like to print (any number between 1 and 14) and for Avery label's select your starting label from the template shown at the left. For Dymo labels, you will also need to select the correct label size from the Select size... drop down menu.
If you find that your labels are printing outside of the margins use the Edit Template button to adjust them accordingly. If you need to adjust the entire label template you can do this by clicking on the Edit Template button, and expanding the window to full view. Drag the mouse over the whole page, releasing the mouse once you have covered the page. The invisible references will now be visible. You can nudge all fields left, right, up and down by hitting the arrow keys on your keyboard. You can save these changes by clicking the Disk icon and closing out of this Edit Template window.
Click the Print button.
Display in list will put the selected label in the label pop down menu so that this screen can be bypassed in future. Bear in mind you will not be able to select starting label or number of labels if you print straight from the label icon.
Note: The label editor facility available in previous versions of Genie is no longer available, nor is it supported. |