Registration and Configuration


|
Registration and Configuration |
|
|
Before you can use Image Pro you need to purchase a registration code from Genie Solutions. Once you have this code:
ImagePro Preferences Note: If you use the single-user version of Genie, then you don't need to fill in any preferences, since you won't be using FTP.
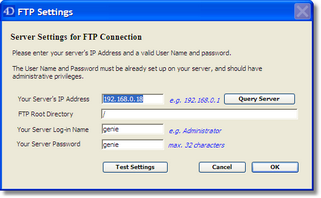
Select Special > ImagePro Control and click on the Network Setup button to open the window shown below:
Server IP Address This is the IP Address of the server computer. You can get this address automatically by clicking the Query Server button.
FTP Root Directory This is the pathway to the Images folder, unless it has already been specified when setting up the FTP server on the server computer.
On Windows or MacOS X Server operating systems, then you should have already specified the Images folder. In this case, you just need to enter a single forward slash in this field i.e. "/".
On Mac OS X (non Server) operating system then you need to specify the full pathway, which would usually be /Applications/Genie/Images/. Note: The name of the hard drive is not included. This pathway must begin and end with a forward slash.
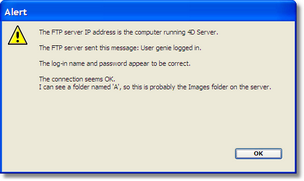
Test Settings Once you have entered the details here, click on the Test Settings button. If you have entered the correct details, and the FTP server is running on your server computer, then a dialogue similar to the one shown below will appear:
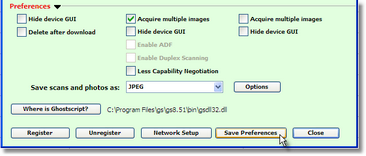
If you get an error message, read the instructions in the Image Pro Troubleshooting section. Setting Preferences Open the ImagePro window (Special > ImagePro Control). The bottom part of this window contains your Preference settings. These settings are unique to each machine on a network.
Preferences are not automatically saved permanently unless you click the Save Preferences button after changing something.
Before you start scanning or acquiring digital photographs via ImagePro, you must specify the image format and quality you want. Generally JPEG is the best format for colour scans and photos. To set the quality, click on the Options button.
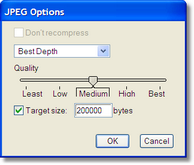
The easiest way to set the quality is to specify the maximum file size in the Target Size field as shown below.
Note: This size is in bytes, so if you want to limit the file size to 200 Kilobytes, you need to enter 200,000 here.
The only problem with larger, high quality images, as far as Genie is concerned, is that they will be slower to copy back and forth over a network. |