Setup


|
Setup |
|
|
Email Accounts Decide whether you want just a single account for the practice, or whether you want to have separate accounts for different users. An “account” is essentially just a different email address.
By default, Genie creates an account with the name of “Primary Account”, which is then used by all the users on a network.
If you want certain users to have their own account, open their User Preferences i.e. File > User Preferences, click on the 'Internet/HIC Online' tab and tick the checkbox Create a separate email account for me. This will create a new account in this user’s login name. Account Details For each email account you wish to use in Genie, you need to enter the appropriate account settings. These details are supplied to you by your Internet Service Provider (ISP) and have nothing to do with Genie. If you are unsure of them, copy them from your regular email program’s Preferences if you are already using email. If not, you will need to call your ISP to find out the details. To configure an email account:
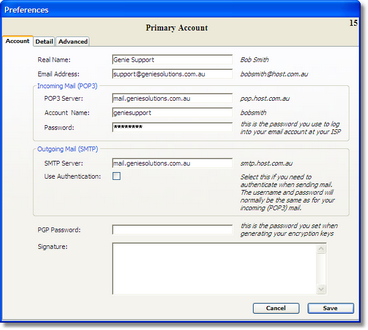
Account Tab Fill in your account details in the window shown below. Use the example text to the right of the fields as a guide.
Note: The Incoming Server commonly takes the form of either “mail.host.com” or “pop.host.com”. The Outgoing Server commonly takes the form of either “mail.host.com” or “smtp.host.com”.
The "PGP Password" is the password that you will use to control the GnuPG encryption program. You may enter that later, or leave this field blank so that you will be asked to enter it manually whenever you want to decrypt an incoming message.
The Use Authentication tickbox should be ticked if you need to authenticate your username and password when sending mail.
The "Signature" is a customisable footer that you can choose to attach to all outgoing email from this account. Typically it would hold your name and other contact details, such as phone and fax numbers. Detail Tab
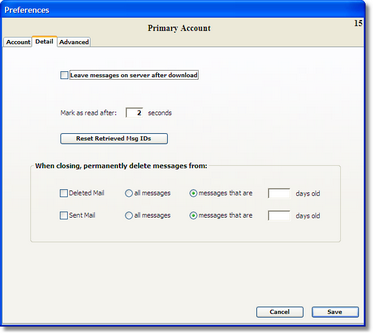
By default, once Genie has downloaded an email from your ISP, it is deleted from the ISP’s server. However, if you tick the Leave messages on server after download checkbox, then Genie will delete them when you next perform a download after the specified number of days.
Note: It is recommended to tick this box so you can also download the messages into another email program eg. Outlook Express or Apple Mail, as it is not generally recommended to use the Genie email as your primary email program due to its simplicity.
When messages first arrive in the In Box, they are displayed in bold. Once you click on them, they are marked as read after the specified number of seconds, and then display in plain text.
If you find that there are messages downloaded into your other email program but are not downloading into Genie email when you click Get Mail, then click the Reset Retrieved Msg IDs.
In this window, you can also specify that messages in your 'Sent' and 'Deleted' folders can be automatically deleted after a specified number of days. Deletion of these records occurs when you close the Email window. Only messages in the currently used Account are deleted, so if you have multiple Accounts but never open them, these old messages will never be deleted automatically. Advanced Tab This tab allows you to override the default mail server ports. You shouldn’t have to change the default POP3 and SMTP Port numbers unless your ISP tells you that they use different ports.
The "Account Password" field can be used to prevent other users from accessing this window and accidentally changing your details. Entering Email Addresses Before you can send an email to someone else, you need to know their email address.
Genie keeps email addresses in a separate table in the database. However, whenever you enter an email address into the ordinary Address Book, or the Patient Demographics window, Genie automatically creates an entry for that person in the Email Address table. If you need to add, modify or delete an email address, click on the Address Book
You should also add your own name and email address, to allow you to send a test message, as detailed below. Send a Test Message To make sure you have entered your email account details correctly, you should send a test message to yourself.
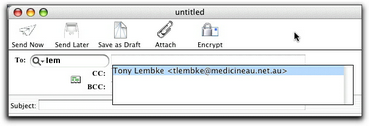
Use the mouse or hit the Enter key to select the record you want. If you have performed this correctly, your name should now be displayed in the To: area.
Note: The Return key does nothing. Only the Enter key works in place of using the mouse.
The cursor should now be in the Subject area. Enter a subject like “Test”, then TAB to the body of the message. Type a few lines in the body, then click the Send Now
Assuming you are already connected to the Internet, Genie should send the message. If you get an error message, read it carefully. It will frequently tell you what the problem is e.g. an incorrect account password, or account login name. If the message has been sent successfully, wait a few moments and then click on the Get Mail
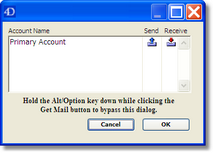
Clicking on the Send and Receive icons will switch these options on and off. Because we don ’t actually have anything to send at the moment, click on the Send icon to switch it off, then click the OK button to retrieve any messages on your ISP’s server.
The test message you just sent should now be in your Inbox. |