Synchronising With iCal/Outlook


|
Synchronising With iCal/Outlook |
|
|
What gets Synchronised? On Macintosh:
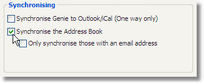
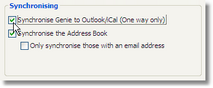
User Preference set to only synchronise one way
On Windows:
User Preference set to only synchronise one way Address Book Open your User Preferences (File > User Preferences), and in the Miscellaneous tab, tick the Synchronise the Address Book checkbox. If you only want Addresses with an email address synchronised then tick Only synchronise those with an email address also.
Synchronisation will then occur at the time you save a new address book entry.
Note: Address Book synchronising is one-way only i.e. addresses added to Outlook or Apple's Address Book are not copied to Genie. Not every field in the Address Book is synchronised Tasks/Appointments In Outlook on Windows, you must create a Category called GenieSync On Macintosh, Genie will automatically create a calendar in iCal, and a Group in Apple's Address Book named GenieSync.
When creating tasks or appointments in either iCal or Outlook, you must classify them as GenieSync so that they will synchronise into Genie.
Note: You must not use Return characters in the Notes field of a To Do/Task in iCal/Outlook. This will result in an extra blank Task being created. If you change the name of a To Do in iCal, a new Task is created in Genie because when synchronising back, Genie searches for a task with the same name, date and time. Changing the subject of a task in Genie has no effect on the To Do in iCal.
In Genie, for Tasks to be synchronised back to iCal/Outlook they must be marked for synchronisation at the time of creation.
For appointments to be synchronised they must either be a patient appointment, or a non-patient appointment whose name is not equal to an Appointment Type. Therefore, a group of appointments which you have blocked off using the Appointment Type popup menu will not be synchronised.
Note: You need to be logged into Genie as the user who wishes to synchronise their Tasks/Appointments eg. you must be logged in as Dr J Smith if you want to synchronise Dr J Smith's appointments.
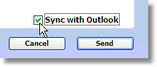
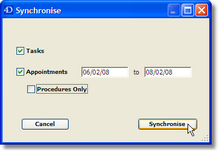
To begin the Synchronisation of Tasks and Appointments, go to Appts > Sync with Outlook/iCal. The Synchronise setup window will appear where you can choose which tables you wish to synchronise and enter a date range for your appointments. Click the Synchronise button for process to begin.
Limitations:
|