Edit Patient


|
Edit Patient |
|
|
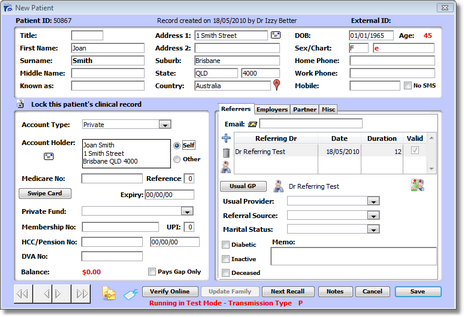
The Edit Patient window can be accessed from the following places in Genie: • The Appointments Book • The Patient Clinical Window • The Patients List To bring up the Edit Patient window, click once on the desired entry and then click on the small Edit Patient icon
The Edit Patient window allows you to make any required changes and adjustments to the Patient's demographic details. The
The Lock this patient's clinical record option allows a record to be locked for use by one provider only. Access to the locked patient's file will require other users to know the password of the user who locked the record initially. A record is locked or unlocked by clicking on the picture of the lock.
It is also where you assign the Patient's Account Type, which will govern what fees are charged by default when invoicing. An Account Holder record must be created in order to invoice a patient by clicking either the Self or Other radio button (see Account Holders). This must be an individual, it cannot be an organisation. The account holder can be changed at the time of invoicing to be that of an organisation or DVA etc.
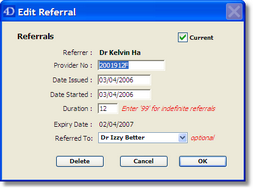
Referral details can be added by clicking on the small Blue Plus next to the Referring Dr table which displays a search box for the Address Book. The Referring doctor address details can be edited via the small Doctor icon, and the referring doctor can be deleted via the Garbage Can icon. To edit or change the Referral period, double click on the Referring doctors name in the Referring Dr table.
The Memo box can be used to type reminders for the patient that you will be alerted to when you make an appointment for the patient and when you put them in the Waiting Room when they arrive for their appointment. It is often used to remind you to give the patient something such as Xrays. The length of time that this memo is displayed for can be adjusted in your User Preferences in the Clinical tab.
The Swipe Card button can be used in conjunction with a card reader. Click the button then swipe the card and it will enter the patients Medicare Number and Expiry Date. It can also be used in the appointment book, click into an appointment cell then swipe the card and this makes the appointment for you. Verify Online will be available if you use HIC Online. It verifies the patient information you have in Genie with that held at Medicare Australia and will let you know if there is any differing information. This helps prevent patient information based rejections in Online Claiming. See Using Online Verification for more information. The Update Family button allows you to automatically update the demographic details (i.e. home address and home phone number) of all patients that share the same Account ID number ie. by the parent having Self selected in their account holder box and all others in the family having Other selected with the parent being the account holder. The Notes button allows you to make extended, progressive notes on the patient, if required. These are stored in the patients clinical file as a Document. If a patient has a Primary Note entered, the Notes button will display in red text with an asterisks (Windows) or just *Notes for Macs. The Envelope button The Email icon The Memo field allows for brief entries, such as patient reminders like "Collect Xrays". Such reminders will then appear in a red Memo box the next time the patient is booked in for an appointment or gets placed in the waiting room via the Coffee Cup icon.
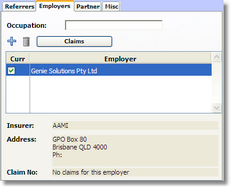
The Employer tab allows you to enter Workcover claim information (for more information on Workcover claims see, Invoicing Workcover).
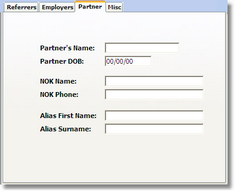
The Partner tab is where you enter partner and next of kin details. The Alias fields are for ECLIPSE health fund claiming when a patients name is registered differently with their private health fund to Medicare.
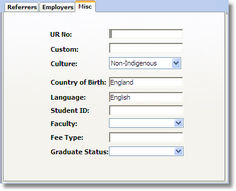
The Misc. tab allows for recording of information such as hospital UR number, student details (used by university medical service sites), as well as the culture and country of birth for the patient.
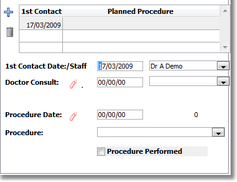
The Conversions tab is activated by having your Practice Type set to 'Plastic Surgery' and allows you to track the number of patients who call to enquire about a procedure, the percentage who progress to a consultation with a provider, and the percentage who subsequently proceed to have the procedure performed. Further information is available in the Procedures section.
|