Import/Export Genie Data


|
Import/Export Genie Data |
|
|
Genie has a number of ways to create new patient records quickly: 1. Via importation of a text file previously exported from another application. 2. Via demographic details sent to you by your pathology provider 3. Via imported pathology results
Exporting data from another application Genie has a very customisable import procedure which allows you to import data stored in a text file in any number of configurations.
The first step is to export the data from the application in which it is already stored.
The standard format for text files on Macintosh is “Tab-delimited” fields and “Return-delimited” records. All this means is that there is a “Tab” character between each field of a record, and a Return character between each individual patient record. Genie then “knows” where to put individual field details, and when to create a new record for the next set of field details.
Most applications will allow you to specify other delimiting characters however. This is sometimes necessary if a particular field already contains a Return character e.g. an address field such as: 10 West St. Westville.
In this case, if you specified “Return-delimited” records when importing, the importing application would see the Return character after “10 West St.”, and assume that this was the end of this record, and create a new record using “Westville” as the surname of the new patient record!
When exporting the data from the original application, write down the names of the fields in the order in which you are exporting them. You will need this information in order to match the same fields in the same order when importing them into Genie. e.g.:
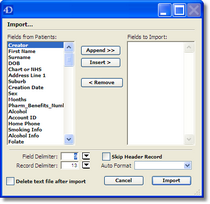
Importing Data into Genie Open the Patients list i.e. Open > Patients, and then select Import from the File menu i.e. File > Import.
Genie’s Import window will open.
The list on the left side of the window displays all the fields available in a patient record. The list on the right side of the window is to display the fields which are to be imported. This list is initially empty. To build the list of fields to be imported, select the field from the list on the left, and then click “Append” to place the field at the end of the new list, or “Insert” to insert the name at the selected place in the new list. You can drag-and-drop fields in to reorder them if you make a mistake.
Make sure that the Field and Record Delimiters match those in the text file you are importing. The default delimiters are Tab (9),and Return (13). Click on the Import button and then open the text file you want to import.
Genie will now import the text file and create the new patient records.
Note: By opening the Address Book instead of the patients list, you can import a list of non-patient contacts into Genie.
Importing Medical Director XML Export of Single Patient This is done through File > Maintenance & Reports > Conversions. Double click on Medical Director Single Patient. From here you will be prompted to Browse for the Export file or folder and to specify which components of the clinical file you would like to import.
Exporting Data from Genie Exporting data from Genie is simply the reverse of importing.
To export patient data: 1. Open the Patients list. (Open > Patients) 2. Display the list of patients to export. (Records > Use Selected) 3. Select “Export” from the File menu (File > Export) 4. Select which format you wish to export the data in i.e. Genie Format or ASCII Format 5. If you selected Genie Format* then this will export the complete clinical records* of the patients on display into the Export folder in your Genie folder. These can then be imported into another Genie database by placing the Export folder into their Genie folder and selecting File > Import from the Patients list and clicking Genie Format. 6. If you selected ASCII Format, select the fields you want to export from the list on the left side of the window, and place them in the list on the right, in the order in which you want them exported. Set the Field and Record delimiters to whatever you require. Click the Export button and you will be asked to name the text file to be exported. Type in a name, and select where you want the file to be stored, then click Save.
*Exporting in Genie Format includes the clinical record and attachments only. The exported patient record is not removed or altered in the source database and cannot be deleted after export. The following items will NOT be exported:
• Financial data • Account histories • Billing items and fees • Bank Accounts • Appointment Preferences • Practice Preferences • User Preferences • HIC Online including PSI store • Appointment Types • Repeating appointments • Merge letter templates • Reply/Referral letter templates • Insurer for Workcover Claims
Note: The export (source) and import (target) databases must be the same Genie version and a full backup must be taken prior to exporting and importing any data.
Exporting in ASCII Format will export only the demographic information for the patients displayed
Genie can import and export data from other tables in the data file e.g. Address Book, Fee Schedule. It depends on which file you have open when choosing Import or Export from the File menu.
Exporting in XML Format If you would like to export your entire Genie database in XML format then this is done through File > Maintenance & Reports > Administrator tab. Genie will export your data to a XML_Export folder in your Genie folder. |