Reviewing Exceptions for a claim


|
Reviewing Exceptions for a claim |
|
|
If a claim contains any exceptions, they must be dealt with before the claim is receipted. Exceptions for a claim are identified in the Exception report which is retrieved from the HIC as described in the previous section 'Retrieving Reports for the Claim'.
The number of exceptions for a claim is listed in the Exceptions column of the Medicare Claims Control window. If the number is 0, the claim has no exceptions. If the number is N/A, either the Exception Report has not yet been retrieved from the HIC, or it has been deleted for some reason. In either case, the exception report should be retrieved from the HIC before proceeding.
Select Exceptions to Review from the Show drop-down list on the Claim Control window to list all claims for which exceptions have been identified. Select the claim for which to review exceptions by clicking once on it in the list. Note that exceptions must be dealt with one claim at a time.
Click on the Review Exceptions button. If this button is greyed out, it means that either the claim did not have any exceptions (the Exceptions column will contain 0), the exception report has been deleted (the Exceptions column will contain N/A), or that the Exception Report has not yet been retrieved (the Exceptions column will contain N/A).
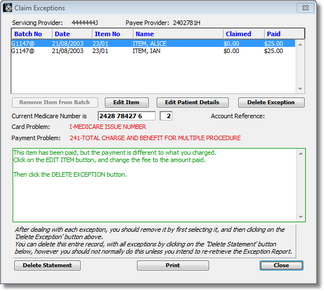
The Claim Exception window lists all exceptions associated with the claim. Each exception must be dealt with before the claim payment can be receipted.
Clicking once on each exception will display more detail about that exception, such as if the Medicare number is incorrect, or the amount claimed is incorrect. It will also display the Medicare or DVA card number currently held by the HIC for the selected patient.
To assist in dealing with the exceptions, a report of all exceptions in the claim can be produced by clicking the Print button.
The first step in determining what to do is to determine whether or not the claim has been paid. This is shown in the Paid column in the picture above. If the claim has been paid: The exception is usually something simple such as an incorrect claim amount, or an incorrect Medicare number. However, you need to fix the problem before receipting otherwise the next time you claim for this patient, the claim may be rejected.
If there is a problem with the item, click on the Edit Item button to open the original item, and change whatever is wrong, e.g. incorrect fee.
If there is a problem with the patient’s details, click on the Edit Patient button and fix whatever is wrong, e.g. incorrect Medicare number or Individual Reference number.
Once you have fixed the problem, click on the Delete Exception button. If the claim has not been paid: The reason is usually more serious e.g. it has already been paid, or it is a duplicate item on the same day which has not been specified as such.
Whatever the reason, you need to determine whether or not you plan to resubmit the item. If you plan to resubmit the item: You must first fix the problem by clicking on either the Edit Patient or Edit Item buttons, and changing whatever is wrong.
Then click on the Remove Item From Batch button. This removes the item from the current batch so that it will be automatically included in the next transmitted batch.
Click on the Delete Exception button. If you do not plan to resubmit the item: For example, you realise that you have accidentally billed the patient twice.
In this case, there’s no point in editing anything. You would simply click on the Remove Item From Batch button.
Click on the Delete Exception button.
You would then need to open the patient’s Account History and Delete the relevant item’s invoice, so that it is not included in the next transmitted batch.
In all cases, once you have taken the appropriate action, you should click the Delete Exception button at the bottom of the window to indicate that the exception has been dealt with. You should not use the Delete Statement button except in extreme circumstances, as this deletes all the displayed exceptions and so would require the exception report to be retrieved again from the HIC. The statement is deleted automatically once the last exception has been deleted.
Once you have dealt with all the exceptions and the list is empty, click the Close button at the bottom of the window to return to the Medicare Claims Control window. |