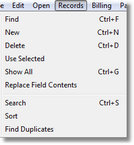
The Records Menu


|
The Records Menu |
|
|
The items in this menu allow you to manipulate the records of the table currently on display. Note: This menu is not available from the Appointments screen. Find, New and Delete Self-explanatory. Use Selected Use Selected reduces the records on display to just those which are highlighted. You would typically use this when sending a merged letter to a group of patients. Suppose you want to send a letter to everyone of a particular age. You would do a Search using Records > Search to find the relevant patient records.
There may be 500 records found but you want to send them out in batches. Initially you may only want to send it to those patients whose surname begins with “A ”. In this case, you would highlight that subsection of patients by shift-clicking,and then choose Records > Use Selected so that now only that subsection of patients is on display, and then select and print the letter.
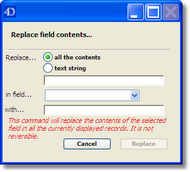
Alternatively, you may want to print a label for John Smith. So you would do a find for “Smith J” and be presented with perhaps 20 records. If you do a label while all 20 records are on display you will get a label for each of these records. In this case, you would highlight the one record you want, select Records > Use Selected, and then print the label. View All Records This will display all the records for the current table on display. Alternatively, you can use the View All Records Replace Replace allows you to replace the contents or part of the contents of any field in all of the records currently on display. This can be a very useful, but dangerous feature and should be used with care. Only the Administrator has access to this feature. Example 1: Merging Practices Two doctors amalgamate their practices, but want to “own” their own patients whose records are going to be imported from another software program. They decide to use the "Custom" field in Genie to specify which patients belong to each doctor by putting their own initials into this field.
This would be very time-consuming to do it one by one into each record. A better way would be:
Example 2: Rename a Street The local council, in its wisdom, decides to change the name of Bourbong Street back to its original, but non-politically correct ,“Bourbon Street”.
Note: You could do a Search at this stage to find all patients where the Address Line 1 field contains “Bourbong” but it’s not really necessary.
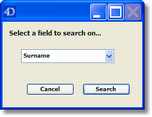
Sort Sort allows you to perform multiple sorts on the records displayed. To perform a simple sort e.g.by Date of Birth, click on the DOB header in the Patients list. Find Duplicates This allows you to find duplicate patient or address book records. You might use this after converting data from another program where duplicate records may have been created. Example: Find duplicate patient records To ensure we don't assume that each patient has a unique full name, we will search on the Surname, First Name and DOB fields.
Note: If you have very large patient database you may want to do this in sections. You could first find all those patients whose surname begins with “A” for example.
See the chapter on The Patients Menu for more information for more information on merging.. |