Patient Paid Full Amount


|
Patient Paid Full Amount |
|
|
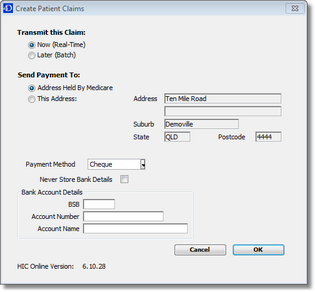
If a payment amount is entered for the invoice, when the Receipt button is clicked the Receipt window is brought up as usual, however the Patient Claims area is displayed with the same values as entered on the invoice. These can be changed here if required. When the Print button is clicked, the Create Patient Claim window is displayed.
In addition to the options provided by the unpaid Patient Claim window, this window provides the following options:
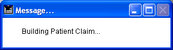
Clicking the OK button results in a Patient Claim being created. The following message is displayed while this occurs:
For Store-And-Forward claims, a Lodgement Advice will be printed and the invoice/receipting process is now completed. Refer to Transmitting Store-And-Forward Claims for information on how to batch and submit these claims to the HIC for processing.
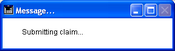
For Real-Time claims, once the claim has been created, it is automatically submitted to the HIC. While this process is occurring the following message is displayed:
If the claim is successful, either a Statement of Claim and Benefit Payment or a Lodgement Advice is printed out, depending on whether or not the invoice has been paid.
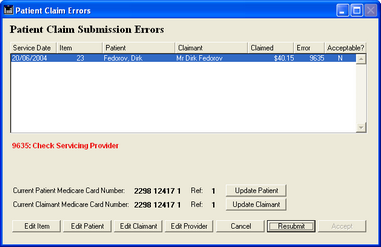
If the claim is unsuccessful, the Patient Claim Errors window will be displayed.
This window lists all of the services which have generated errors. Clicking on a service will display the corresponding error message in red. In the example displayed, the service has failed because the servicing provider has not been registered for HIC Online.
Depending on the nature of the error, it may be appropriate to edit the Item, Patient, Claimant, or Provider details. Buttons are provided on this window to take you directly to the entity in question. If it is simply a matter of the patient or claimant’s Medicare Number or Individual Reference Number being incorrect, these can be easily updated to the values held by the HIC by clicking on the Update Patient and Update Claimant buttons.
Some errors may not be serious enough to cause the claim to be rejected. These errors have a Y in the Acceptable column. If all of the errors are Acceptable, the Accept button will be enabled. Clicking the Accept button will send the claim to the HIC for manual processing.
If all of the errors which have an N in the Acceptable column have been dealt with by editing the Item, Patient, Claimant or Provider details, the entire claim can be resubmitted by clicking the Resubmit button.
Clicking the Cancel button will return you to the Create Patient Claim window. If the problems cannot be rectified from here, click the Cancel button to skip the Patient Claims process and print out a normal invoice or receipt. |