Scanning from Within Genie


|
Scanning from Within Genie |
|
|
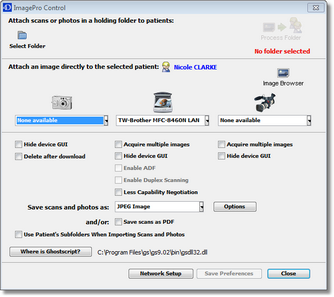
This is the easiest method if you just have a single document, such as a referral letter from a newly arrived patient. In this case you would click on their name in the Appointments Book, open the ImagePro Control window (Special > ImagePro Control) and click on the Scanner icon. Or you can right click on the patients name and select Scan. This will scan straight to the patient's file without bringing up the ImagePro Control window.
If you open the ImagePro Control window, you can choose to scan the document as a PDF (either single or multi page) by ticking the 'Save scans as PDF', otherwise choose the file type from the Save scans and photos as: drop down menu.
Note: In order to view PDF documents on Windows, you will need to download and install Ghostscript. Please see Installing Ghostscript for further details.
You also have the options to:
The scanner’s own window will launch. Most scanners have a button or a menu command to return the scanned image to a requesting application.
Once scanning has started you should see the following window.
Once scanning has completed, you will be asked to name the file.
You don’t have to enter the file type extension when naming the scan. Genie will do this for you automatically, based on the file type you have selected in the Preferences.
Genie initially places the scan into a folder named 'TempImages' inside the Genie folder. It then converts the scan to the image format and size which you have specified in Preferences. It then copies the resultant file to the patient’s image folder on the server. |