Consultation Notes


|
Consultation Notes |
|
|
To open a new consultation note, you can either type Command or Ctrl N OR Tools > New Consultation OR click the Add Consult (or Consults) button at the top of the clinical window.
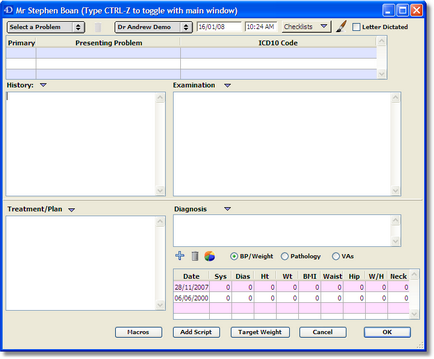
Presenting Problems Presenting Problems aid in searching and reporting consults, as well as providing you with headings for your consults in the Contact List.
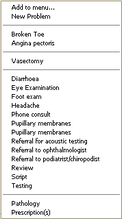
To enter the Presenting Problem/s, you can select the problem from the menu at the top left of the Consult window.
Presenting Problems Menu
This menu can contain up to five sections:
New Problem
User added items can be deleted by holding down the ALT key, selecting the Presenting Problem drop-down list and highlighting the problem to delete. Let go of your mouse, let go of the ALT key.
You can add multiple problems for each consultation.
If the problem you want is not in this menu, select Add to menu... and enter in the name of the problem.
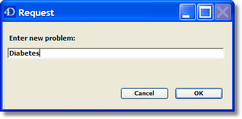
If the problem is a rare or one-off problem select 'New Problem' which will add it only to that patient.
Enter the problem and click OK.
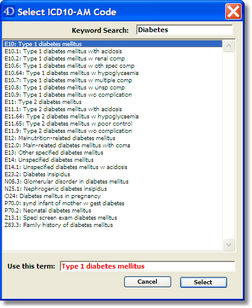
If you are using ICPC or ICD10 coding, a separate coding window will appear.
Select the appropriate item from the list, or just click OK to use what you have typed.
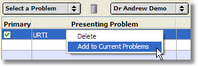
The Presenting Problems can be added to the Diagnosis field by double clicking on them.
The Presenting Problem can be deleted or added to the Current Problem list by right clicking on the problem.
A Presenting Problem can also be deleted using the small Garbage Can icon. Adding Consultation Notes To add consultation notes simply start typing in the History, Examination, Treatment/Plan and Diagnosis areas. The consult is saved when the clinical record is saved, or when OK is clicked in the new consult window.
Checklists can aid in note taking, particularly for standard examinations and pre op checks. See the section on Checklist. Macros can also be used to aid in faster note taking i.e. text expansion from a typed shortcut, a la Spellcatcher and As-U-Type. The macro feature is available in Letters, Consults, and certain fields in Pregnancies, IVF, Checklists, Tasks, Email, and Procedures. Macros are triggered by typing your shortcut followed by a Space or Carriage Return. Or by using the small drop down arrows next to History, Examination, Treatment/Plan and Diagnosis to select the Macro you would like inserted. The Macros button is where you can set up your Macros. If you currently use Spellcatcher or As-U-Type you can import your existing macros, by selecting Edit Macros and clicking on the Import button. This will give you instructions on how to first export your existing macros from Spellcatcher and As-U-Type. You can then import this file. The Drawing Template
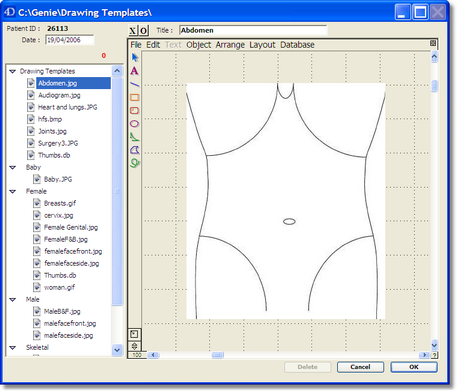
If you wish to add your own images/templates, then you will need to copy these into C:\Genie\Drawing Templates\ (PC's), or Applications:Genie:Drawing Templates: (Mac's).
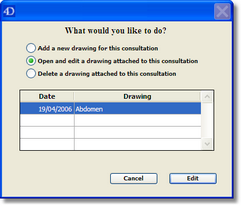
You can access a previously saved drawing by opening the relevant consultation record, and clicking on the Drawing Template button. Select 'open and edit a drawing attached to this consultation' and highlight the required drawing from the presented list.
Additionally, you can add a new or delete an attached drawing for this consultation.
The Letter Dictated tickbox aids your typist and you in keeping track of dictated letters (See Today's Consultations in The Patients Menu)
Consult notes can be edited directly within 24 hours or appended thereafter by double-clicking on the consult in the All Contacts List of the general clinical window.
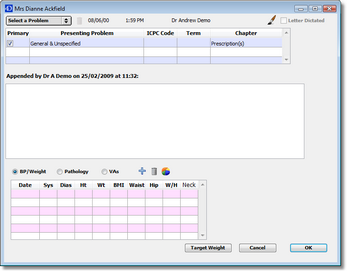
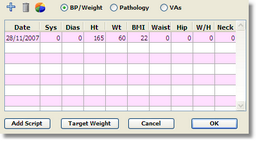
Measurements
BP/Weight radio button displays all previously recorded measurements.
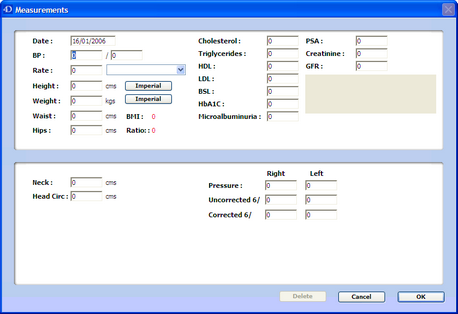
The Pathology radio button will display previous pathology results that are imported into Genie in PIT format (provided the Extract Path Results PIT Format is ticked in File > User Preferences) or HL7 format (provided Track Individual Pathology Results is set up in Maintenance and Reports) or those manually entered into the Measurements window.
The following measurements will be auto populated if tracking is selected for those tests in Maintenance and Reports:
Note: Pathology result measurements other than those listed above will not populate into other measurement fields in the clinical record eg. Obstetric History or Current Pregnancy.
VAs displays previous visual acuity records
To add a new Measurement record from within a consultation, you can either use the shortcut Ctrl N or click on the Blue Plus sign.
A new Measurement record window will open, which has the field that you are clicking in already highlighted, see below.
The Measurement will appear in the display area when the corresponding consultation record is displayed.
To delete a measurement record, highlight it and click the Garbage Can icon.
Some of these measurements can be graphed by clicking the Graph button.
Note: For patients over 20 years of age, their previous height is entered automatically the next time a new measurement record is opened.
Keeping Separate Consultations To add another consult when one has already been created for that day, simply open up another new consult window (Tools > New Consult or Ctrl N).
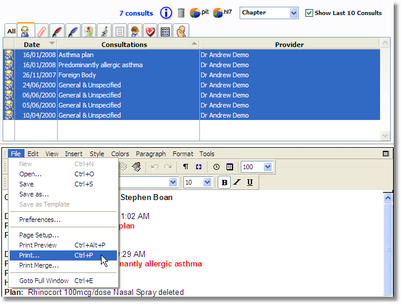
If you don't wish to create a separate consultation for the same day, then just use the keyboard shortcut Ctrl Z or Tools > Modify Today's Consultation, or the Edit Consult button, as this will open up the existing consultation window. It will create a new consultation if one doesn't already exist. Viewing Consultation Notes Consultation notes can be viewed singly in the display area by clicking on the record, or several at a time by Shift or Control clicking on the required consults.
They can also be viewed according to their ICPC code. If you are using ICPC coding a pop-up menu will appear above the All Contact list. This codes display presenting problems by Chapter, allowing you to view all Neurological type consultations for example.
Printing Consults Once you have your required Consults or Pathology results highlighted and on display in the display area (by Ctrl or Shift clicking the required consults), you can then print the display area by selecting File > Print or clicking the small Printer icon.
Deleting a Consult To delete a consult from the All Contacts List, highlight the required consult and then click on the Garbage Can icon. Or you can right click and select Delete.
Note: Within 24 hours this will delete the consult altogether. After 24 hours the consult isn't deleted per se, it is just hidden from the Contacts List.
Alt clicking on the Garbage Can icon will display the deleted consults in the Contacts List. Alternatively, you can print a Consultation Summary, Tools > Consultation Summary, which gives you the option to Include Deleted Consultations. Checking Consults Have Been Created You can check that you have made consultation notes for all appointments of a particular day by going to that day in the appointment and selecting Appts > Check Missing Consults. This will check for a consultation record for the date selected and for notes typed into the History field. You will need to have typed notes into the History field for this feature to work. |